The entire system is a curious feat of engineering. Externally, it resembles a bulky VR headset mounted on a bipod. The player must position their head close to the eyepiece to see the game in action.
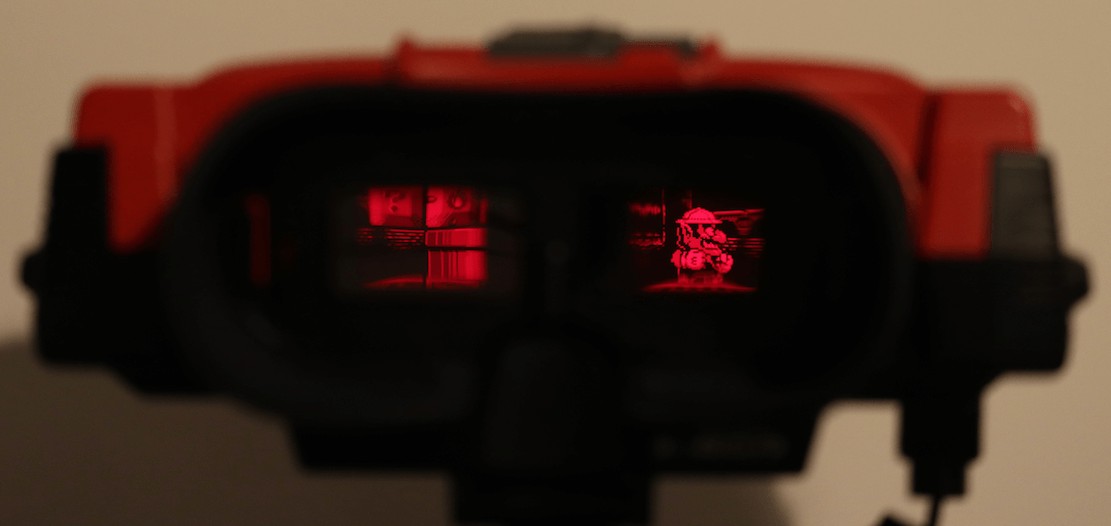
This is as far as I got trying to photograph the display and the case simultaneously. In reality, games look very crisp and in full size!
Internally, it's a whole different story (and a very complicated one). For this reason, I thought it would be better to begin by explaining how this console displays images, and then delve into its internal hardware.
Projecting an image
Once you switch on the Virtual Boy, you will see two monochromatic red pictures (one for each eye) through the eyepiece. So far, so good? Well, here is the interesting part: this console doesn't have a screen. What you're seeing is more of an illusion, so let's take a closer look at what's really going on.
The topics involved in explaining this (including optics, visual phenomena, and so on) may seem complex at first, so I drew many diagrams to make this section a little more immersive.
Scanner
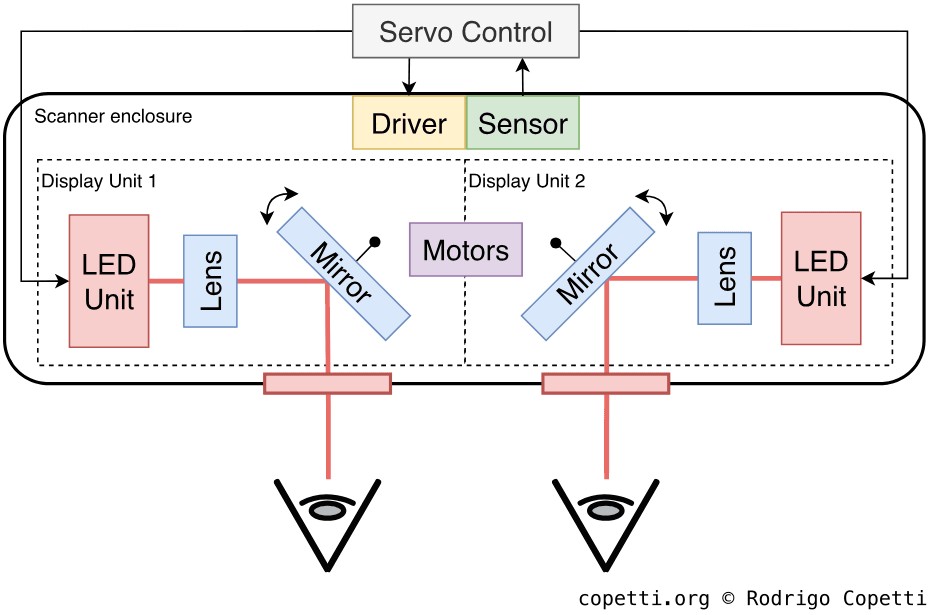
Main diagram of the scanner, showing how light from the LEDs reaches the player's eyes.
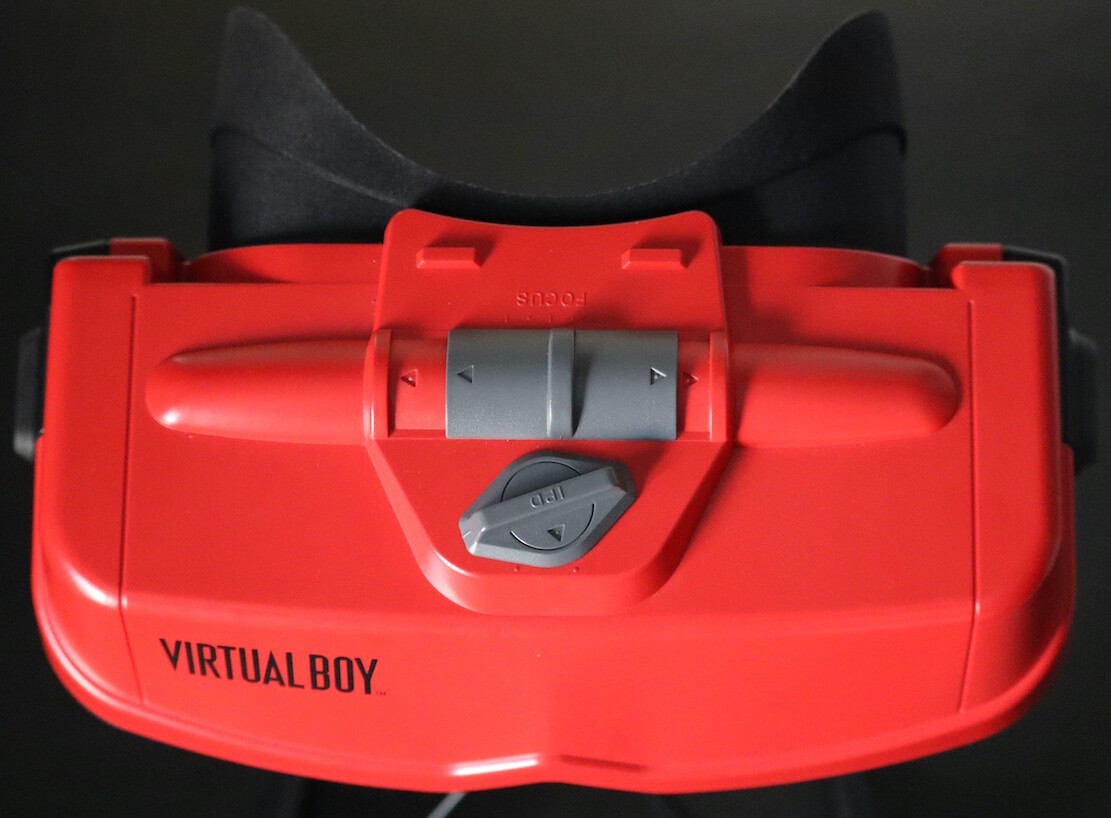
Bird's-eye view of the console. The first switch is the 'focus slider', and below it is the 'IPD dial'.
The large volume of this console is attributed to the scanner, which occupies a significant part of the interior. The scanner is the area of the Virtual Boy responsible for displaying images. It's composed of two display units, each of which independently projects a frame (giving a total of two frames, one for each eye).
A display unit is where all the 'magic' happens. It consists of the following components:
- An LED unit: Contains 224 red LEDs stacked vertically, along with the necessary circuitry to control each one.
- A lens: Refracts light from the LEDs.
- At the top of the Virtual Boy's casing, there is a focus slider used to shift the lens closer to or farther from the LEDs. This allows the user to adjust the console according to their focal length (preventing blurry images).
- A mirror: Reflects light from the lens and directs it to the user's eyes. Furthermore, this component oscillates continuously, thanks to a voice coil motor connected to it. The motor is controlled by the servo control, a separate board that sends electrical pulses at 50 Hz.
- All in all, this is a very complex and fragile area of the console. So, an additional photo interrupter (a type of photosensor) is installed. The interrupter reports the oscillation observed from the mirror to the servo control, which in turn monitors and applies the necessary corrections.
Next to the focus slider is an IPD dial (a knob-shaped switch), which adjusts the distance between the two display units. This is done to adapt the displays to the user's interpupillary distance.
Mechanics
Animation available in the modern edition
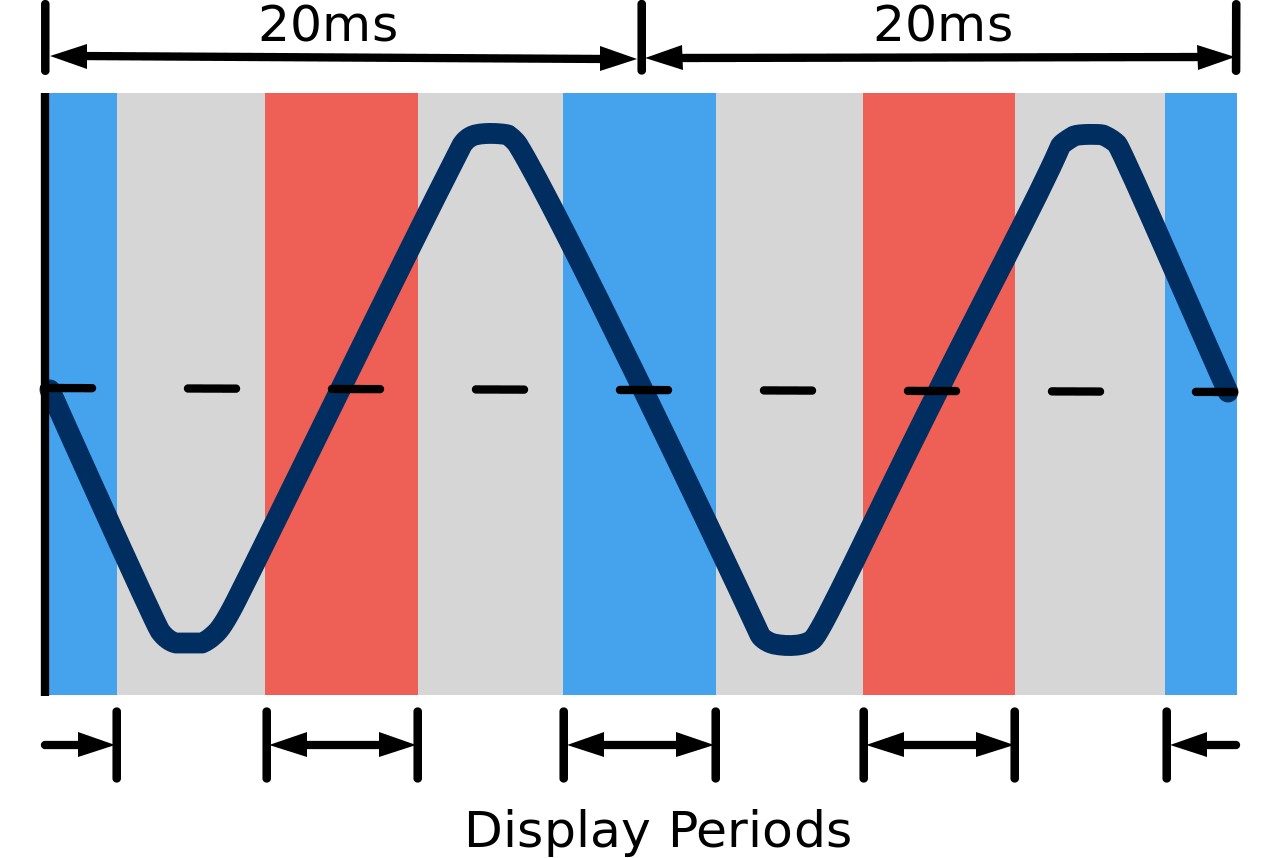
A simplified visualisation of the angle of the oscillating mirror over time. The Y-axis indicates the angle and the X-axis represents time. The left and right LEDs are active during the red and blue intervals, respectively. During the grey interval, no LEDs are active. For simplicity, the angular velocity represented here is constant (this is variable in the real world).
Now that we have each component identified, let's take a look at how the Virtual Boy manages to present images to our eyes.
If you haven't noticed before, there isn't a dot-matrix display to be found, so how come we can see two-dimensional images through the eyepiece? Similarly to a CRT monitor, the display units exploit the way we perceive images:
- The oscillating mirrors enable a single column of LEDs to shift horizontally across our field of view. The angle of the mirror is strategically directed to project the LEDs across 384 distinct 'column positions' (distributed across our field of view).
- Because human vision is logarithmic and the mirror oscillates at 50 Hz (each period takes 20 ms), we end up perceiving 384 columns of LEDs illuminating at the same time until the mirror stops oscillating. This is the result of the afterimage effect.
- All of this is carefully synchronised with the LED controller, which updates each individual LED as the mirror moves slightly. Thus, we end up perceiving a full picture coming from the eyepiece.
In reality, some conditions must be met for these principles to work:
- The LEDs must only operate when the angular velocity of the mirror is stable (in other words, when the mirror is not changing direction). This can be thought of as the active state of a CRT monitor.
- Building on the previous point, the angular velocity of the mirror doesn't remain constant in practice. As the mirror cannot change direction instantly, 'stable' periods are subject to forces that disrupt its velocity. To manage this, the Virtual Boy stores a list of values in memory called Column Table, which specifies how much time to allocate for each column interval. This helps balance excessive and insufficient periods of 'LED column' exposure.
- Finally, let's not forget that this entire process occurs twice, as there are two display units (one for each eye). Unfortunately, both units can't draw energy and data at the same time, so each one operates at different display periods (out-of-phase, 10 ms apart). We don't notice this, yet another illusion!
Display
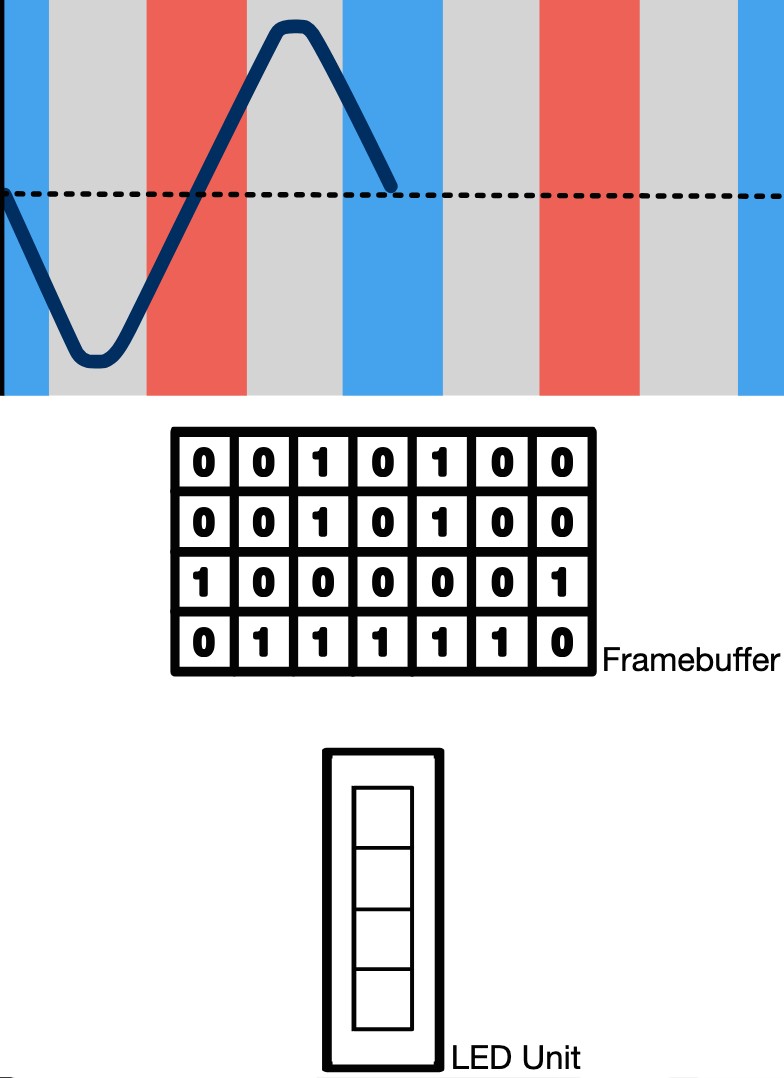
Animation available in the modern edition
A simplified illustration of how the first LED unit operates during specific periods of time. Notice how the LEDs display columns of the frame buffer during active phases.
Contrary to previous video chips modelled on CRT displays (e.g. the PPU and VDP), the Virtual Boy does not render graphics on-the-fly. Instead, its graphics chip sends the processed frame to a frame buffer in memory. Then, each column of the frame is transferred to the LED array for display.
When the servo board determines it's time to display, the graphics chip will transmit columns of pixels from the frame buffer to the 224 vertically stacked LEDs, in a carefully synchronised manner. As a result, the LEDs display 384 columns during the display period, giving the console a 'screen resolution' 384x224 pixels.
Moreover, we need to store two frame buffers, since each one will go to a different display unit. The graphics subsystem also employs double-buffering and other quirks (outlined later in the 'Graphics' section). So, for now, just remember how a digital frame is sent to the LEDs.
Active periods
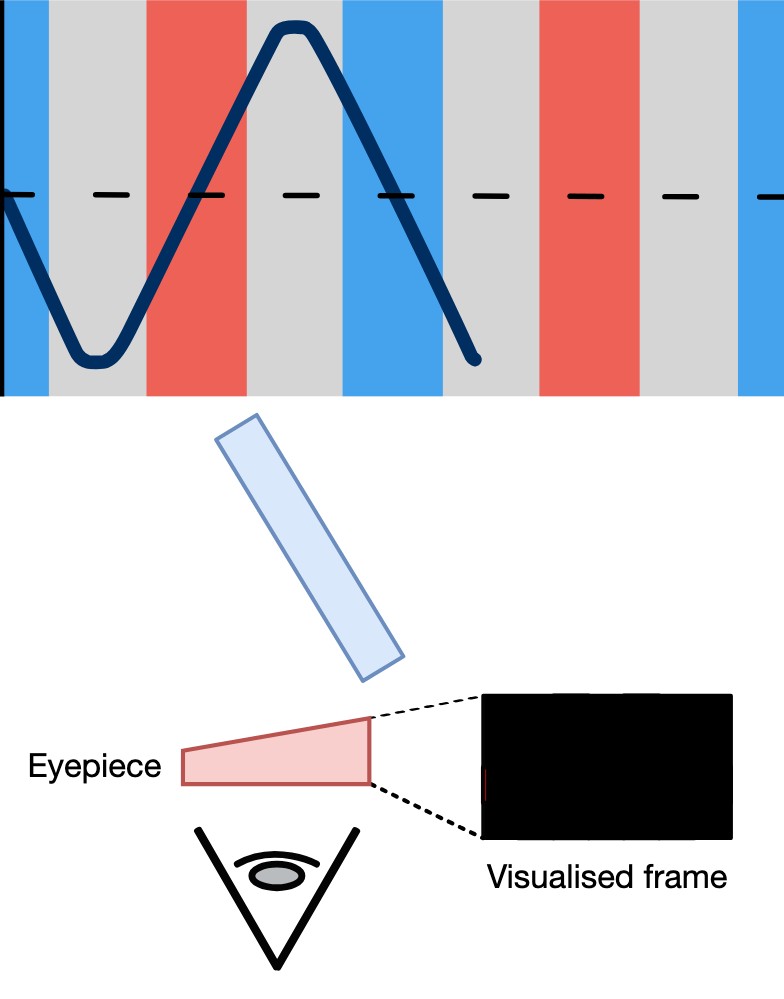
Animation available in the modern edition
Another simplified illustration, this time showing how the oscillation of the mirror deflects LED light so the user ultimately perceives a proper frame.
As a consequence of this design, there will be periods of:
- Active Display: During this time, the LEDs are pulling an image from the frame buffer and nothing can disrupt it.
- Active Display 2: Identical to the previous phase, but now the second display unit is active.
- Drawing idle: A period in which none of the LEDs are operating and the mirror's angular velocity is unstable.
This cycle repeats 50 times per second (hence the 50 Hz refresh rate), meaning that for each frame, the CPU and GPU have approximately 10 milliseconds to update the picture the user will see. In practice, Nintendo's engineers implemented a more sophisticated solution. I will elaborate further in the 'Graphics' section, but for now, I hope you got a good understanding of how the Virtual Boy cleverly managed to generate visuals using inexpensive hardware.
Closing comments
This has been a brief explanation of how optics can transform a single vertical line into a picture. If you own (or have read about) the Virtual Boy, you may be wondering when the three-dimensional imagery comes into play. I want to clarify that none of the previous explanations relate to that effect. I mention this because in the past I've seen claims suggesting that the oscillating mirrors are the cause of the 'depth perception' effect. However, based on the information I've gathered throughout this study, I believe that assertion is inaccurate.
That being said, I think it's time we delve into the 3D phenomenon...
Producing a third-dimensional vision
During the marketing campaign of the Virtual Boy, there was a lot of fanfare regarding the console's ability to project a '3D world'. I'm not referring to images with 3D polygons stamped (as seen on the other fifth-generation consoles), but rather to the actual perception of depth.
In a nutshell, the Virtual Boy relies on stereoscopic imagery to achieve that illusion . Overall, this system not only toyed with our vision to project a complete image, but also made certain drawings appear closer or further away than others!
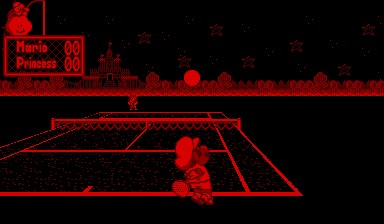
Left display unit.
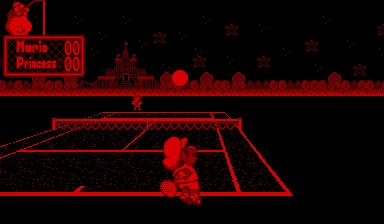
Right display unit.
The technique employed is very simple: each of the two frames displayed (one for each eye) contains elements slightly shifted horizontally. So, when viewed with both eyes, these shifts create the illusion that some parts of the image are nearer than others. The perceived depth depends on the direction in which the elements are offset.
Objects shifted towards the centre of the viewer's eyes (moved right in the left frame, and left in the right frame) appear closer; those shifted away from the centre appear further away. Finally, elements with no horizontal shift are perceived as being between the two extremes. This approach is known as stereoscopic parallax.
One of the drawbacks of stereoscopy is eyestrain. This was alleviated by the fact that games provided an 'automatic pause' feature, which reminded the user to take breaks every 30 minutes. Nintendo also included various warning messages in their packaging and documentation to help prevent serious conditions. That said, there was no option to disable the 3D effect.